Update Summer 2020;
You can find what I'm up to at https://www.instagram.com/back40bikes/ or https://back40.net/

Saturday, July 04, 2020
Friday, December 02, 2016
Update:
It's been a long time since I posted here. I'm still building carbon frames but making a big change in direction. Below is one of many steps towards molding tubes and frame components in-house.
3D Printing:
In order to create molded carbon tubes and frame parts I needed to be able to mold silicone bladders that fit the inside shape of the final carbon parts. I didn't want to use wrinkle prone sleeves or other methods. I want to use shaped bladders. In order to make molds I purchased a 3D printer. I chose an Atom 2.0 Printer for the accuracy and print volume (particularly print height). Now, each iteration of a mold costs about $10 worth of ABS filament.
Here are mold components for a bottom bracket bladder being printed.

I lightly sanded the parts, smoothed them with acetone and covered them in mold release.

I mixed up the two part silicone and attempted to degas it prior to injecting into the mold.
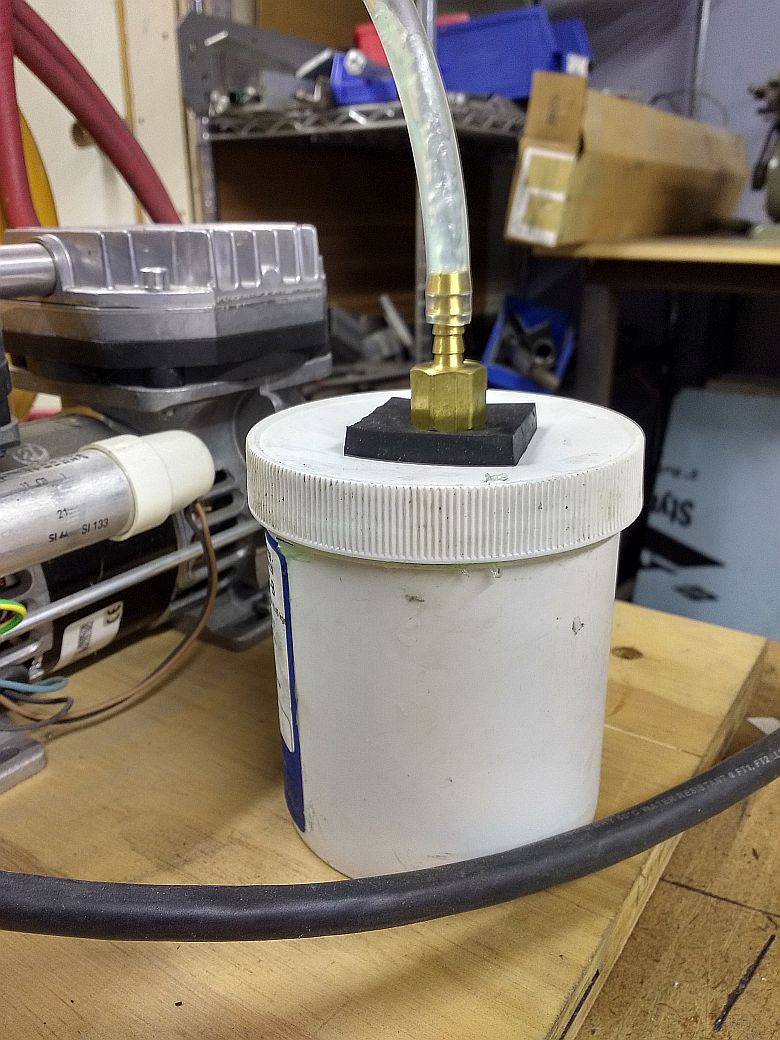
I used an empty caulking tube and caulking gun to inject the silicone into the mold. It started to pop open (the end cap) so I had to clamp it shut during the injection phase. Having made the mold parts out of "clear" ABS I could tell the mold was filling well.

After letting it cure overnight I trimmed the excess silicone and opened the mold.

It was a bit of a struggle to get the core part of the mold out of the bladder. Luckily the silicone stretches a long way. The finished bladder has some flash and a few bubbles in it but it holds air which is the important part. The flash trimmed of easily leaving a smooth outer surface.

I've also been using the printer to make models of each tube I intend to mold. More to come...

Monday, December 29, 2014
Testing
I've been working on ways to make the frames faster and more consistent. In particular I've been working on the joint process.
Below is the new release layer being removed from the test joint prior to laying the carbon fiber.

After a standard bagging and baking process this is the result "out of the oven". It took only seconds to unwrap the test joint. Previously, using release cloth, this was a time consuming process.

Below on the left is the bare sanded tube I used for the test joint. On the right there are 5 layers of uni-directional carbon. It almost looks transparent in the photo but it's actually the texture of the tube itself duplicated in the new release layer process.

On one half of the joint I experimented with allowing resin overflow through small holes in the release layer. Not sure it was worth the extra effort, not much resin flowed out into the breather layer. I's also difficult to remove the little epoxy nubs cleanly.

Up next should be a new road frame using this process for the tube joining.
Below is the new release layer being removed from the test joint prior to laying the carbon fiber.
After a standard bagging and baking process this is the result "out of the oven". It took only seconds to unwrap the test joint. Previously, using release cloth, this was a time consuming process.
Below on the left is the bare sanded tube I used for the test joint. On the right there are 5 layers of uni-directional carbon. It almost looks transparent in the photo but it's actually the texture of the tube itself duplicated in the new release layer process.
On one half of the joint I experimented with allowing resin overflow through small holes in the release layer. Not sure it was worth the extra effort, not much resin flowed out into the breather layer. I's also difficult to remove the little epoxy nubs cleanly.
Up next should be a new road frame using this process for the tube joining.
Sunday, May 04, 2014
Cross Assembled and Tested
The larger of the two frames was for me. I've put over 900km on the bike now, some of which was on very rough gravel Jeep roads.
Here it is assembled waiting for it's first ride (and for the snow to finally melt).
 Some of the detail in the seat cluster area.
 The TRP front brake and re-painted ENVE fork.
 This is how the heavily modified Crumpton dropouts and shortened ENVE seat stay molding turned out. Note the stay cable guide. I used solid casing from bar to derailleurs on this bike to keep everything running smoothly.
 In April I was riding in South Carolina and finally, having the right bike along, did a loop using Horsepasture Road. It's a Jeep road located in the Jocassee Gorges Management Area. Horespasture Info
After riding the loop I'd suggest a 29r over a cross bike. 34x28 low gear and 33C tires were not ideal for riding this loop given the steeper pitches, loose surface in places and my poor spring climbing form.

 The view from Jumping Off Rock lookout was more then worth the climb though.

.jpg) If nothing cracked or broke on the frame on the bone shaking descent I can't see it being an issue where I normally ride.
If nothing cracked or broke on the frame on the bone shaking descent I can't see it being an issue where I normally ride.
Here it is assembled waiting for it's first ride (and for the snow to finally melt).
After riding the loop I'd suggest a 29r over a cross bike. 34x28 low gear and 33C tires were not ideal for riding this loop given the steeper pitches, loose surface in places and my poor spring climbing form.
Finished Cross Frames
It's been a while since I last updated. I've since managed to have both frames painted and one assembled and test ridden extensively.
Here is the smaller frame back from paint. It had matte clear logo under gloss finish applied.
Here is the BB area.

And one of the hand made cable guides (titanium tubing wrapped in carbon).
 More photos to follow once this frame is built up.
Here is the smaller frame back from paint. It had matte clear logo under gloss finish applied.
Here is the BB area.
And one of the hand made cable guides (titanium tubing wrapped in carbon).
Friday, October 25, 2013
Two Cross
Two cross frames just about ready for some clear coat.
BB wrap initial layers span the joint from DT to rear end.
 TT triple cable guide made from carbon wrapped titanium tube sections. These are for solid casing from lever to derailleur/brake.
 Initial layers of HT wrapping.
 Finished HT wrapping prior to vacuum bagging and baking.
 Front of finished wrapped HT.
 Both cross frames sanded and ready for clear coat.


BB wrap initial layers span the joint from DT to rear end.


Tuesday, October 01, 2013
Cross Frame Ready for Paint
I've got the latest carbon frame 99% ready for clear coat etc. Just need to slot the seat tube at the top and it's ready to go.
The layers of carbon show through and even more with gloss clear applied.
 The custom extended seat stay plugs to fit the ENVE rear end turned out nicely.
 The frame is built for continuous casing. This is one of the guides bonded on. It's carbon wrapped around small a titanium tube. They are bonded on but don't take any brake or shifting force.
 Excellent clearance for 33C cross tires. I could probably get some monster 42C tires in back and front.
 Three triple top tube guides. Again, carbon wrapped titanium bonded on.
 Stay tuned for cross frame number two up next...


Sunday, September 08, 2013
Glued and Filleted
I picked up the dropout parts from anodizing and fit the seat stay assembly in the jig. That was the last step before gluing the tubes together. Below is the bonded seat tube joint.
 Here is the head tube joint. Prior to applying the joint fillets I rough sand the carbon (just a bit) and clean the whole frame with isopropyl alcohol.
 This is a BB fillet in the un-sanded state. Once it cures I'll file and sand it to shape. The glass micro spheres in the epoxy make for easy shaping.
 Weight of glued frame. It should come in around 1050g all finished with paint. The ENVE cross rear end isn't all that light.
 Lots of tire clearance here. That's a 25mm shown. Should be able to use a 35mm.


Subscribe to:
Posts (Atom)